Tally Tips - Your Weekly Refresher...!
Did you know...
Short Message Service
Did you know that you can now access information by SMS?
This can be done in four easy & simple steps:
1. Include Mobile Number
Login to the Control Centre by providing User ID and Password
2. Enable SMS
3. Authorise Users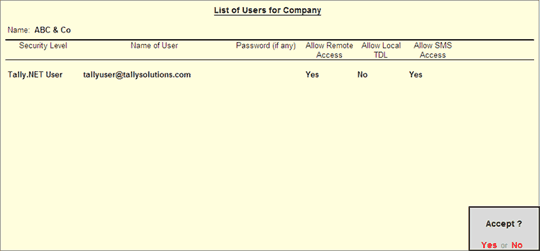
Connect Company
Select the required Tally License Server from the list displayed to configure the clients.
Unlock Key
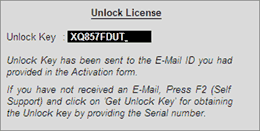
Did you know that you can get the Unlock Key on your own without any help?
Yes, you can now get the Unlock Key by pressing the F2: Self Support button in the Unlock License screen or you can visit the Self Support page available on the website.
Synchronisation
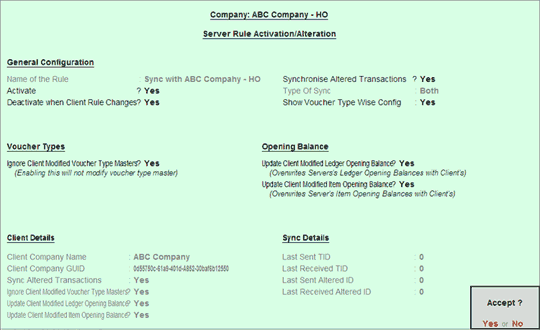
Did you know that you can deactivate the Server Rule to prevent any unauthorised changes?
Yes, this is possible, in order to prevent the Server Rule from undergoing any unauthorised changes. Set Yes to Deactivate when client rule changes. When enabled, this option deactivates the Server Rule and halts the Synchronisation process.
Payroll
Did you know that you can print more than two Pay Slips on a single sheet?
The option to print more than one document on a single page is available in the Printer Properties and this can be used to print more than one Pay Slip on a single page.
Execute the following steps to print more than one Pay Slip on a single page.
Go to Gateway of Tally > Multi Account Printing > Multi Pay Slip Printing

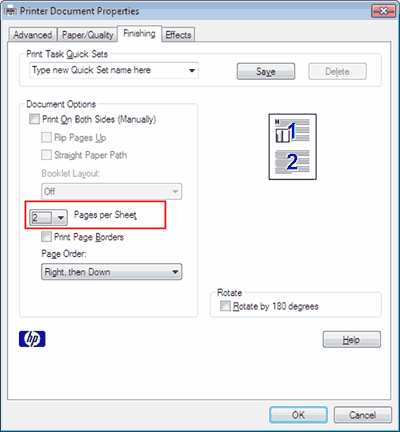
In Printer Properties click Finishing tab
• Set the option Pages per Sheet to 2
• Press OK
• Press Enter to print the Pay Slips
Did you know...
Short Message Service
Did you know that you can now access information by SMS?
This can be done in four easy & simple steps:
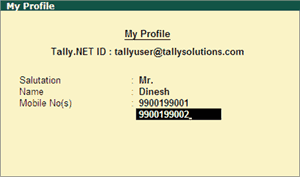
1. Include Mobile Number
Login to the Control Centre by providing User ID and Password
- Click W: My Profile or press Alt+W
- Select the required Salutation
- Enter the name of the Contact Person
- Enter the mobile number in Mobile No(s) field

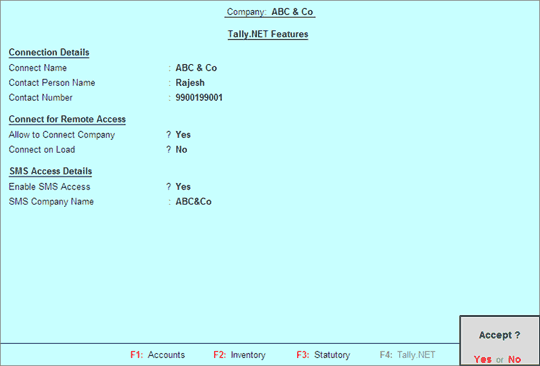
2. Enable SMS
- Go to Gateway of Tally > F11: Features > F4: Tally.NET Features
- Set Yes to Enable SMS Access
- Enter the short name for the company in SMS Company Name

3. Authorise Users
- Go to Gateway of Tally > click F3: Cmp Info > Security Controls > User and Passwords
- Select the required Security Level
- Enter user’s email id in Name of User
- Set Yes to Allow Remote Access
- Set Yes to Allow SMS Access

Connect Company
- Go to Gateway of Tally > click F4: Connect
On successfully connecting the company to Tally.NET the message appears in the calculator pane.
You can now proceed to query information via SMS by sending in your queries to 556679<9>
<9> is the SMS Suffix or a unique sequence number allotted to each company connected.
Auto Backup
Did you know that Tally.ERP 9 can be configured to automatically backup the data?
Yes, it is possible to take a data backup without disturbing your day-to-day work. This can be achieved by enabling the option Enable Auto Backup in the Company Creation/Company Alteration screen while creating or altering the company.
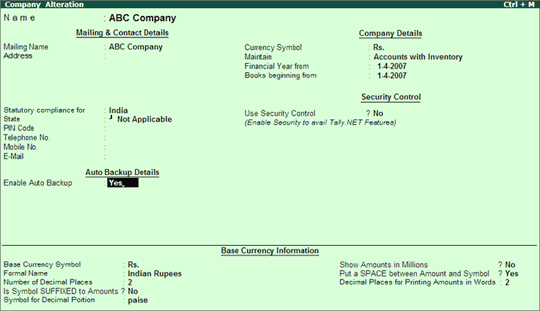
On enabling this option the data backup file ABK.900 is stored in the data folder of the respective company.
E.g.: A company named Unique Traders has a folder 10008 located in C:\Tally.ERP9\Data. On enabling the Auto Backup feature the backup file ABK.900 is created inC:\Tally.EPR9\Data\10008.
Licensing
Configure Clients at Startup
Did you know that you can configure Tally.ERP 9 clients without knowing the Server Name/IP Address and Port Number?
Yes, it is possible to configure Tally.ERP 9 clients. All you need to do is press F2: License Servers to display the list of license servers available in the network.
You can now proceed to query information via SMS by sending in your queries to 556679<9>
<9> is the SMS Suffix or a unique sequence number allotted to each company connected.
Auto Backup
Did you know that Tally.ERP 9 can be configured to automatically backup the data?
Yes, it is possible to take a data backup without disturbing your day-to-day work. This can be achieved by enabling the option Enable Auto Backup in the Company Creation/Company Alteration screen while creating or altering the company.

On enabling this option the data backup file ABK.900 is stored in the data folder of the respective company.
E.g.: A company named Unique Traders has a folder 10008 located in C:\Tally.ERP9\Data. On enabling the Auto Backup feature the backup file ABK.900 is created inC:\Tally.EPR9\Data\10008.
Licensing
Configure Clients at Startup
Did you know that you can configure Tally.ERP 9 clients without knowing the Server Name/IP Address and Port Number?
Yes, it is possible to configure Tally.ERP 9 clients. All you need to do is press F2: License Servers to display the list of license servers available in the network.

Select the required Tally License Server from the list displayed to configure the clients.
Unlock Key
Did you know that you can get the Unlock Key on your own without any help?
Yes, you can now get the Unlock Key by pressing the F2: Self Support button in the Unlock License screen or you can visit the Self Support page available on the website.

Synchronisation
Did you know that you can deactivate the Server Rule to prevent any unauthorised changes?
Yes, this is possible, in order to prevent the Server Rule from undergoing any unauthorised changes. Set Yes to Deactivate when client rule changes. When enabled, this option deactivates the Server Rule and halts the Synchronisation process.

Payroll
Did you know that you can print more than two Pay Slips on a single sheet?
The option to print more than one document on a single page is available in the Printer Properties and this can be used to print more than one Pay Slip on a single page.
Execute the following steps to print more than one Pay Slip on a single page.
Go to Gateway of Tally > Multi Account Printing > Multi Pay Slip Printing
- Press Alt+S: Select Printer option
- Select the required Printer from the List of Printers as shown:

In Printer Properties click Finishing tab
• Set the option Pages per Sheet to 2

• Press OK
• Press Enter to print the Pay Slips
Value Added Tax
Did you know that you can record the VAT Payment Entry even without the V: VAT Paymentbutton?
Yes, it is possible to make Statutory Payments with the help of a new button S: Stat Payment.
Did you know that you can record the VAT Payment Entry even without the V: VAT Paymentbutton?
Yes, it is possible to make Statutory Payments with the help of a new button S: Stat Payment.
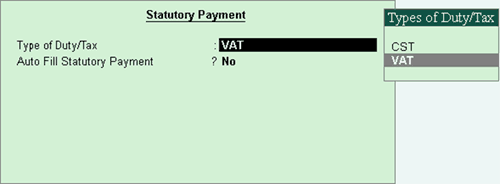
- Click S: Stat Payment or press Alt+S
- List of Statutory Tax types as activated in F11 Statutory Features appears
- Select the Type of Duty/Tax as VAT

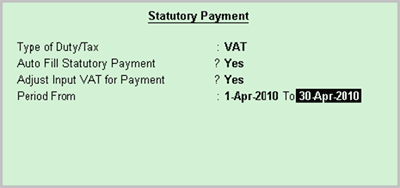
- Set Yes to Auto Fill Statutory Payment in order to auto calculate the Output VAT directly or after setting off the Input VAT
- Set Yes to Adjust Input VAT for Payment in order to adjust the Input VAT with Output VAT

- Specify the period for which the VAT adjustment needs to be done
- Based on the above, the values are auto filled in the Payment Voucher
- Select the cash/bank account and give details in the Provide Details sub screen
Did you know that you can fill up the VAT Payment Details when altering the VAT Payment Voucher?
In the Alteration Mode of the VAT Payment entry, the Stat Payment button is disabled.
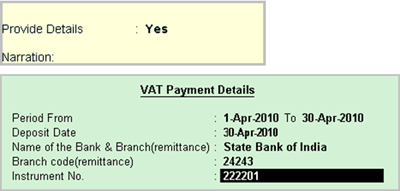
Set Yes to Provide Details in the Provide Details sub screen
Did you know that you can Auto Fill the VAT Amounts?
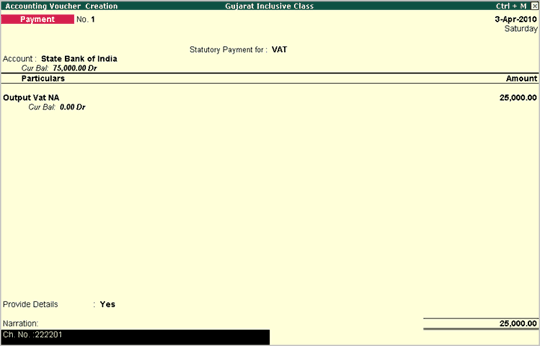
The VAT payable amount will be automatically calculated and displayed in the PaymentVoucher based on the options selected in the Stat Payment button.
To display the Output VAT ledger balance for the specified period in the Payment Voucher set the options Auto Fill Statutory Payment to Yes and Adjust Input VAT for Payment to No
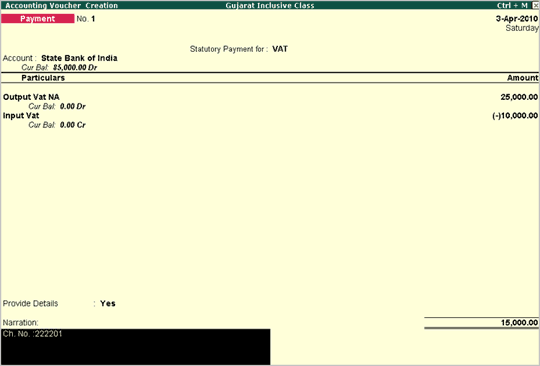
To consider the Input VAT Ledger for deciding the payment amount for a specified period set the options Auto Fill Statutory Payment and Adjust Input VAT for Payment to Yes
Note: To use this facility, the VAT Sub Type option needs to filled with Input VAT or Output VAT for respective Input VAT and Output VAT Duty Ledgers as both the ledgers are grouped under Duties & Taxes with Duty/Tax as Type of VAT. If the Sub Type is not selected, then the auto fill option will not be functional. For transactions passed earlier, the ledgers need to be re-accepted with the VAT Sub Type option.
Did you know that the Auto Fill Functionality for a VAT Ledger populates only when the VAT Sub Type is selected?
Yes, the Statutory Payment Auto Fill Functionality will appear only when the VAT Sub Type is selected compulsorily for VAT Duties and Taxes group. Not selecting the VAT Sub Type option will not invoke the Input VAT adjustment for payment functions.
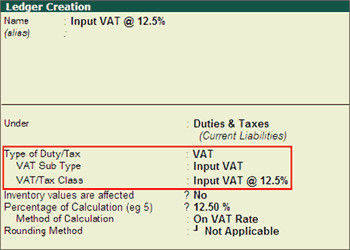
The user needs to select Input VAT for Input VAT Ledgers, and Output VAT for Output VATLedgers as VAT Sub Type.
In the Alteration Mode of the VAT Payment entry, the Stat Payment button is disabled.
Set Yes to Provide Details in the Provide Details sub screen

Did you know that you can Auto Fill the VAT Amounts?
The VAT payable amount will be automatically calculated and displayed in the PaymentVoucher based on the options selected in the Stat Payment button.
To display the Output VAT ledger balance for the specified period in the Payment Voucher set the options Auto Fill Statutory Payment to Yes and Adjust Input VAT for Payment to No

To consider the Input VAT Ledger for deciding the payment amount for a specified period set the options Auto Fill Statutory Payment and Adjust Input VAT for Payment to Yes

Note: To use this facility, the VAT Sub Type option needs to filled with Input VAT or Output VAT for respective Input VAT and Output VAT Duty Ledgers as both the ledgers are grouped under Duties & Taxes with Duty/Tax as Type of VAT. If the Sub Type is not selected, then the auto fill option will not be functional. For transactions passed earlier, the ledgers need to be re-accepted with the VAT Sub Type option.
Did you know that the Auto Fill Functionality for a VAT Ledger populates only when the VAT Sub Type is selected?
Yes, the Statutory Payment Auto Fill Functionality will appear only when the VAT Sub Type is selected compulsorily for VAT Duties and Taxes group. Not selecting the VAT Sub Type option will not invoke the Input VAT adjustment for payment functions.

The user needs to select Input VAT for Input VAT Ledgers, and Output VAT for Output VATLedgers as VAT Sub Type.
